常见通讯类型
同步通讯:打电话,直播就是同步实时传输信息
异步通讯:发邮件,发短信就是有时间差的传输
两种方式各有优劣,打电话可以立即得到响应,但是你却不能跟多个人同时通话。发送邮件可以同时与多个人收发邮件,但是往往响应会有延迟。
同步调用的优点
- 时效性较强,可以立即得到结果
同步调用的问题:
耦合度高
性能和吞吐能力下降
有额外的资源消耗
有级联失败问题
异步通讯 异步调用则可以避免上述问题: 1.我们以购买商品为例,用户支付后需要调用订单服务完成订单状态修改,调用物流服务,从仓库分配响应的库存并准备发货。 2.在事件模式中,支付服务是事件发布者(publisher),在支付完成后只需要发布一个支付成功的事件(event),事件中带上订单id。 3.订单服务和物流服务是事件订阅者(Consumer),订阅支付成功的事件,监听到事件后完成自己业务即可。 4.为了解除事件发布者与订阅者之间的耦合,两者并不是直接通信,而是有一个中间人(Broker)。 5.发布者发布事件到Broker,不关心谁来订阅事件。订阅者从Broker订阅事件,不关心谁发来的消息。
RabbitMQ安装
方法一:
在线拉取: docker pull rabbitmq:3.8-management

本地加载: docker load -i mq.tar

运行MQ容器:
docker run \
 -e RABBITMQ_DEFAULT_USER=itcast \
 -e RABBITMQ_DEFAULT_PASS=123321 \
 --name mq \
 --hostname mq1 \
 -p 15672:15672 \
 -p 5672:5672 \
 -d \
 rabbitmq:3.8-management
方法二:
给
/docker/rabbitmq/log和/docker/rabbitmq/data路径文件夹给777权限
version: '3'

services:
  rabbitmq:
    image: rabbitmq:3.10.6
    container_name: rabbitmq
    build:
      context: ./rabbitmq
    environment:
      RABBITMQ_DEFAULT_USER: guest
      RABBITMQ_DEFAULT_PASS: guest
    ports:
      - "15672:15672" # 管理界面端口
      - "5672:5672"   # api 端口
    volumes:
      - /docker/rabbitmq/log:/var/log/rabbitmq
      - /docker/rabbitmq/data:/var/lib/rabbitmq
    network_mode: "host"
开放端口:15672 5672
RabbitMQ基本结构
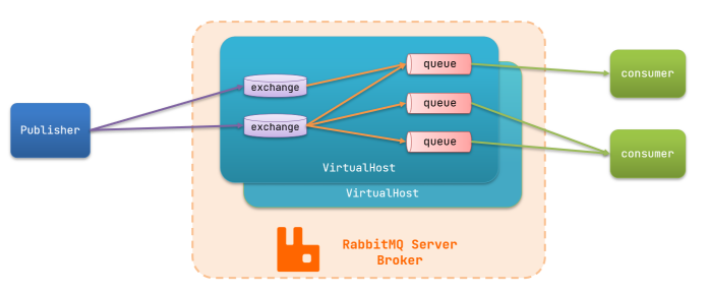
publisher:生产者
consumer:消费者
exchange个:交换机,负责消息路由
queue:队列,存储消息
virtualHost:虚拟主机,隔离不同租户的exchange、queue、消息的隔离
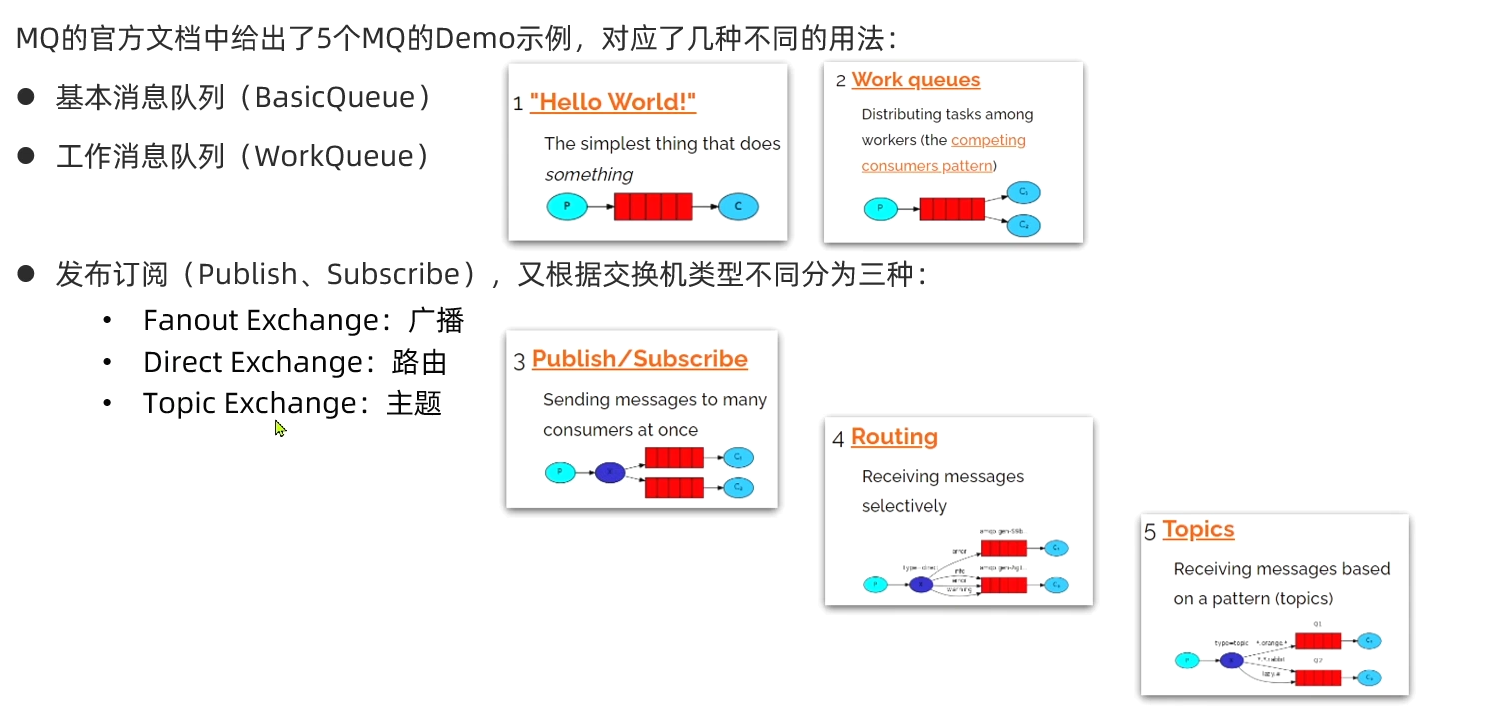
RabbitMQ消息模型
RabbitMQ官方提供了5个不同的Demo示例,对应了不同的消息模型
RabbitMQ实战
简单队列

最基础的消息队列模型来实现的,只包括三个角色
publisher:消息发布者,将消息发送到队列queue
queue:消息队列,负责接受并缓存消息
consumer:订阅队列,处理队列中的消息
基本消息队列的消息发送流程:
建立connection
创建channel
利用channel声明队列
利用channel向队列发送消息
基本消息队列的消息接收流程:
建立connection
创建channel
利用channel声明队列
定义consumer的消费行为handleDelivery()
利用channel将消费者与队列绑定
交换机-Direct
接着我们先使用下direct exchange(直连型交换机),创建
RabbitConfig.java(对于队列和交换机持久化以及连接使用设置,在注释里有说明,后面的不同交换机的配置就不做同样说明了):
生产服
pom.xml里用到的jar依赖:
<!--rabbitmq-->
<dependency>
    <groupId>org.springframework.boot</groupId>
    <artifactId>spring-boot-starter-amqp</artifactId>
</dependency>
<dependency>
    <groupId>org.springframework.boot</groupId>
    <artifactId>spring-boot-starter-web</artifactId>
</dependency>
然后application.yml:
server:
  port: 5672

spring:
  rabbitmq:
    host: localhost  #mq服务器ip,默认为localhost
    port: 5672          #mq服务器port,默认为5672
    username: guest     #mq服务器username,默认为gust
    password: guest     #mq服务器password,默认为guest
RabbitConfig.java
import org.springframework.amqp.core.Binding;
import org.springframework.amqp.core.BindingBuilder;
import org.springframework.amqp.core.DirectExchange;
import org.springframework.amqp.core.Queue;
import org.springframework.context.annotation.Bean;
import org.springframework.context.annotation.Configuration;

/**
 * @Author:
 * @Date:
 * @Description:
 */
@Configuration
public class DirectRabbitConfig  {

    //队列 起名:TestDirectQueue
    @Bean
    public Queue TestDirectQueue() {
        // durable:是否持久化,默认是false,持久化队列:会被存储在磁盘上,当消息代理重启时仍然存在,暂存队列:当前连接有效
        // exclusive:默认也是false,只能被当前创建的连接使用,而且当连接关闭后队列即被删除。此参考优先级高于durable
        // autoDelete:是否自动删除,当没有生产者或者消费者使用此队列,该队列会自动删除。
        //   return new Queue("TestDirectQueue",true,true,false);

        //一般设置一下队列的持久化就好,其余两个就是默认false
        return new Queue("TestDirectQueue",true);
    }

    //Direct交换机 起名:TestDirectExchange
    @Bean
    DirectExchange TestDirectExchange() {
        //  return new DirectExchange("TestDirectExchange",true,true);
        return new DirectExchange("TestDirectExchange",true,false);
    }

    //绑定  将队列和交换机绑定, 并设置用于匹配键:TestDirectRouting
    @Bean
    Binding bindingDirect() {
        return BindingBuilder.bind(TestDirectQueue()).to(TestDirectExchange()).with("TestDirectRouting");
    }


    @Bean
    DirectExchange lonelyDirectExchange() {
        return new DirectExchange("lonelyDirectExchange");
    }

}
然后写个简单的接口进行消息推送(根据需求也可以改为定时任务等等,具体看需求),
SendMessageController.java:
import org.springframework.amqp.rabbit.core.RabbitTemplate;
import org.springframework.beans.factory.annotation.Autowired;
import org.springframework.web.bind.annotation.GetMapping;
import org.springframework.web.bind.annotation.RestController;
import java.time.LocalDateTime;
import java.time.format.DateTimeFormatter;
import java.util.HashMap;
import java.util.Map;
import java.util.UUID;

/**
 * @Author :
 * @CreateTime :
 * @Description :
 **/
@RestController
public class SendMessageController {

    @Autowired
    RabbitTemplate rabbitTemplate;  //使用RabbitTemplate,这提供了接收/发送等等方法

    @GetMapping("/sendDirectMessage")
    public String sendDirectMessage() {
        String messageId = String.valueOf(UUID.randomUUID());
        String messageData = "test message, hello!";
        String createTime = LocalDateTime.now().format(DateTimeFormatter.ofPattern("yyyy-MM-dd HH:mm:ss"));
        Map<String,Object> map=new HashMap<>();
        map.put("messageId",messageId);
        map.put("messageData",messageData);
        map.put("createTime",createTime);
        //将消息携带绑定键值:TestDirectRouting 发送到交换机TestDirectExchange
        rabbitTemplate.convertAndSend("TestDirectExchange", "TestDirectRouting", map);
        return "ok";
    }

}
把rabbitmq-provider项目运行,调用下接口:
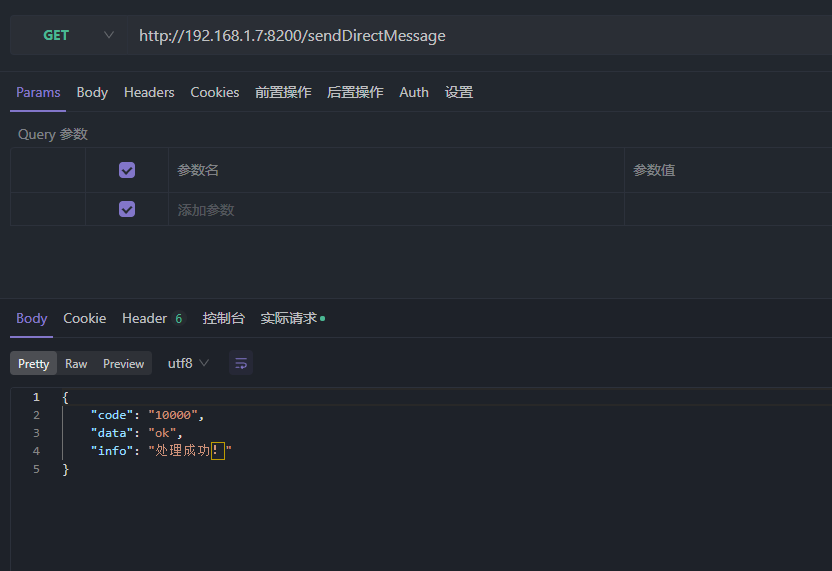
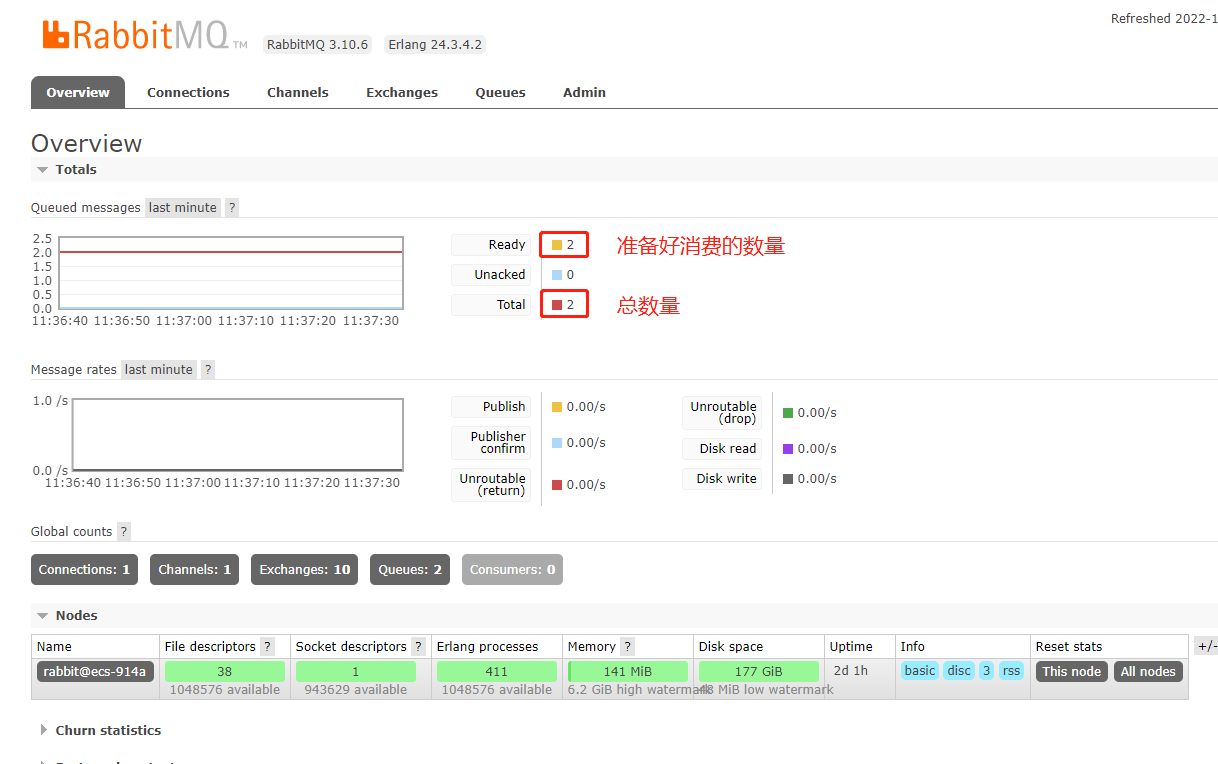
我们去rabbitMq管理页面看看,是否推送成功:
(我执行了2次 所以数量是2)
再看看队列(界面上的各个英文项代表什么意思,可以自己查查哈,对理解还是有帮助的):
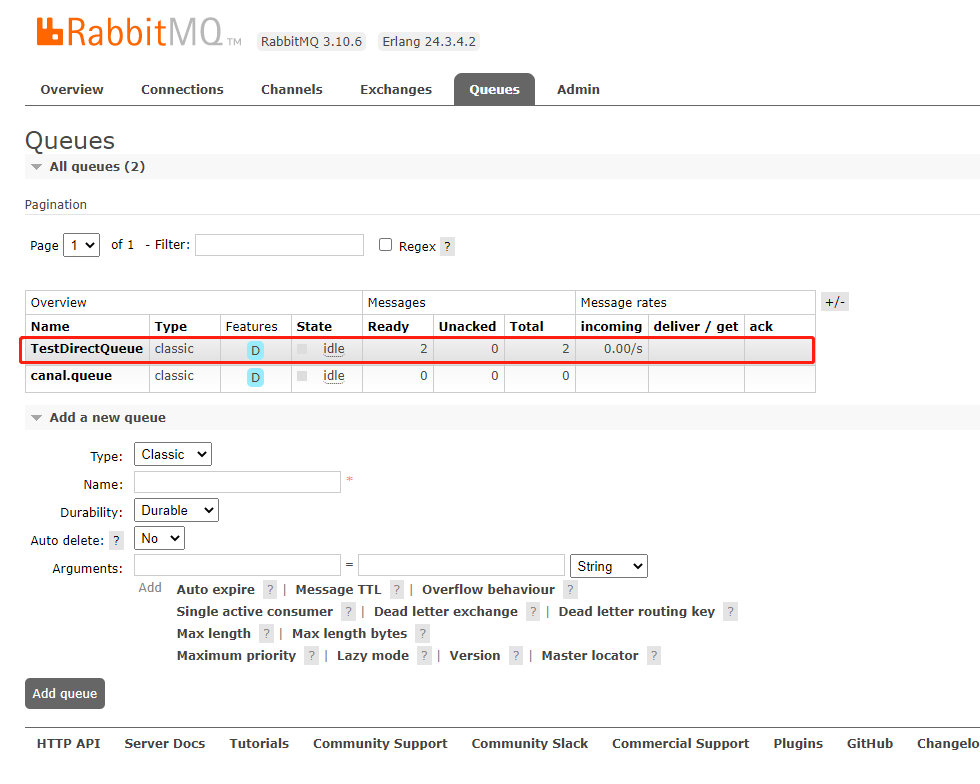
消息已经推送到rabbitMq服务器上面了。
消费服(一对一)
pom.xml里的jar依赖:
<!--rabbitmq-->
<dependency>
    <groupId>org.springframework.boot</groupId>
    <artifactId>spring-boot-starter-amqp</artifactId>
</dependency>
<dependency>
    <groupId>org.springframework.boot</groupId>
    <artifactId>spring-boot-starter</artifactId>
</dependency>
然后是 application.yml:
server:
  port: 8022
spring:
  #给项目来个名字
  application:
    name: rabbitmq-consumer
  #配置rabbitMq 服务器
  rabbitmq:
    host: localhost  #mq服务器ip,默认为localhost
    port: 5672          #mq服务器port,默认为5672
    username: guest     #mq服务器username,默认为gust
    password: guest     #mq服务器password,默认为guest
然后一样,创建DirectRabbitConfig.java(消费者单纯的使用,其实可以不用添加这个配置,直接建后面的监听就好,使用注解来让监听器监听对应的队列即可。配置上了的话,其实消费者也是生成者的身份,也能推送该消息。):
DirectRabbitConfig.java
import org.springframework.amqp.core.Binding;
import org.springframework.amqp.core.BindingBuilder;
import org.springframework.amqp.core.DirectExchange;
import org.springframework.amqp.core.Queue;
import org.springframework.context.annotation.Bean;
import org.springframework.context.annotation.Configuration;

/**
 * @Author : JCccc
 * @CreateTime : 2019/9/3
 * @Description :
 **/
@Configuration
public class DirectRabbitConfig {

    //队列 起名:TestDirectQueue
    @Bean
    public Queue TestDirectQueue() {
        return new Queue("TestDirectQueue",true);
    }

    //Direct交换机 起名:TestDirectExchange
    @Bean
    DirectExchange TestDirectExchange() {
        return new DirectExchange("TestDirectExchange");
    }

    //绑定  将队列和交换机绑定, 并设置用于匹配键:TestDirectRouting
    @Bean
    Binding bindingDirect() {
        return BindingBuilder.bind(TestDirectQueue()).to(TestDirectExchange()).with("TestDirectRouting");
    }
}
然后是创建消息接收监听类 RabbitDirectReceiver.java
RabbitDirectReceiver.java
import org.springframework.amqp.rabbit.annotation.RabbitHandler;
import org.springframework.amqp.rabbit.annotation.RabbitListener;
import org.springframework.stereotype.Component;

import java.util.Map;

/**
 * 监听消息队列
 */

@Component
@RabbitListener(queues = "TestDirectQueue")//监听的队列名称 TestDirectQueue
public class RabbitDirectReceiver {

    @RabbitHandler
    public void process(Map testMessage) {
        System.out.println("DirectReceiver消费者收到消息  : " + testMessage.toString());
    }

}
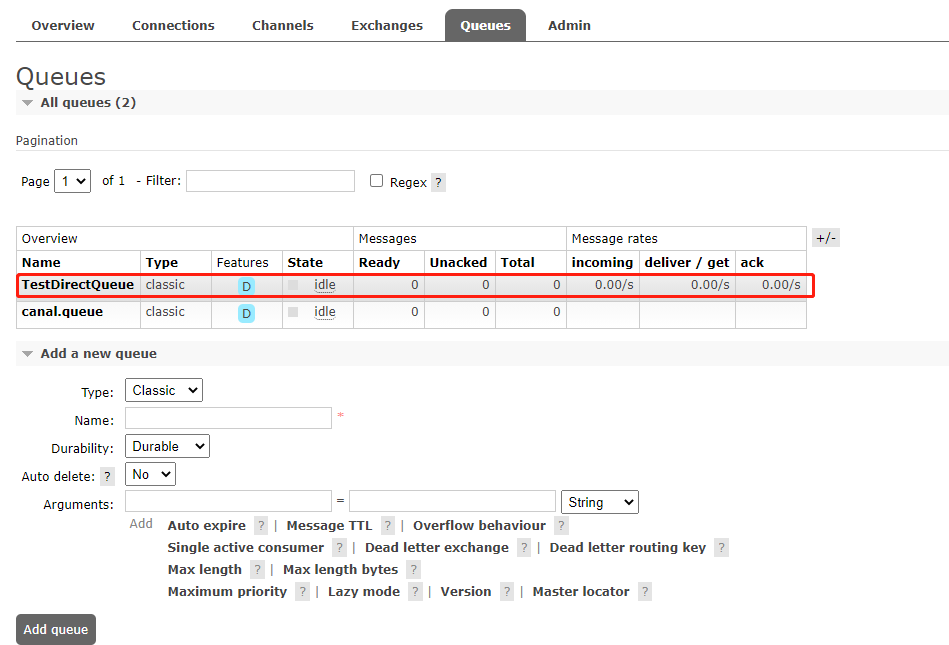
然后启动项目会发现,把之前推送的消息 消费下来了

消费服(一对多)
如果有多个消费服务监听同一个生产者
轮循的方式进行消费,而且不存在重复消费。


交换机-Topic
Topic Exchange 主题交换机
生产服
项目里面创建TopicRabbitConfig.java
import org.springframework.amqp.core.Binding;
import org.springframework.amqp.core.BindingBuilder;
import org.springframework.amqp.core.Queue;
import org.springframework.amqp.core.TopicExchange;
import org.springframework.context.annotation.Bean;
import org.springframework.context.annotation.Configuration;

/**
 * @Author : JCccc
 * @CreateTime : 2019/9/3
 * @Description :
 **/

@Configuration
public class TopicRabbitConfig {
    //绑定键
    public final static String man = "topic.man";
    public final static String woman = "topic.woman";

    @Bean
    public Queue firstQueue() {
        return new Queue(TopicRabbitConfig.man);
    }

    @Bean
    public Queue secondQueue() {
        return new Queue(TopicRabbitConfig.woman);
    }

    @Bean
    TopicExchange exchange() {
        return new TopicExchange("topicExchange");
    }


    //将firstQueue和topicExchange绑定,而且绑定的键值为topic.man
    //这样只要是消息携带的路由键是topic.man,才会分发到该队列
    @Bean
    Binding bindingExchangeMessage() {
        return BindingBuilder.bind(firstQueue()).to(exchange()).with(man);
    }

    //将secondQueue和topicExchange绑定,而且绑定的键值为用上通配路由键规则topic.#
    // 这样只要是消息携带的路由键是以topic.开头,都会分发到该队列
    @Bean
    Binding bindingExchangeMessage2() {
        return BindingBuilder.bind(secondQueue()).to(exchange()).with("topic.#");
    }

}
然后添加多2个接口,用于推送消息到主题交换机
    @GetMapping("/sendTopicMessage1")
    public String sendTopicMessage1() {
        String messageId = String.valueOf(UUID.randomUUID());
        String messageData = "message: M A N ";
        String createTime = LocalDateTime.now().format(DateTimeFormatter.ofPattern("yyyy-MM-dd HH:mm:ss"));
        Map<String, Object> manMap = new HashMap<>();
        manMap.put("messageId", messageId);
        manMap.put("messageData", messageData);
        manMap.put("createTime", createTime);
        rabbitTemplate.convertAndSend("topicExchange", "topic.man", manMap);
        return "ok";
    }

    @GetMapping("/sendTopicMessage2")
    public String sendTopicMessage2() {
        String messageId = String.valueOf(UUID.randomUUID());
        String messageData = "message: woman is all ";
        String createTime = LocalDateTime.now().format(DateTimeFormatter.ofPattern("yyyy-MM-dd HH:mm:ss"));
        Map<String, Object> womanMap = new HashMap<>();
        womanMap.put("messageId", messageId);
        womanMap.put("messageData", messageData);
        womanMap.put("createTime", createTime);
        rabbitTemplate.convertAndSend("topicExchange", "topic.woman", womanMap);
        return "ok";
    }
}
消费服
创建TopicManReceiver.java
import org.springframework.amqp.rabbit.annotation.RabbitHandler;
import org.springframework.amqp.rabbit.annotation.RabbitListener;
import org.springframework.stereotype.Component;
import java.util.Map;

/**
 * @Author : JCccc
 * @CreateTime : 2019/9/3
 * @Description :
 **/
@Component
@RabbitListener(queues = "topic.man")
public class TopicManReceiver {

    @RabbitHandler
    public void process(Map testMessage) {
        System.out.println("TopicManReceiver消费者收到消息  : " + testMessage.toString());
    }
}
再创建一个TopicTotalReceiver.java
package com.elegant.rabbitmqconsumer.receiver;

import org.springframework.amqp.rabbit.annotation.RabbitHandler;
import org.springframework.amqp.rabbit.annotation.RabbitListener;
import org.springframework.stereotype.Component;
import java.util.Map;

/**
 * @Author : JCccc
 * @CreateTime : 2019/9/3
 * @Description :
 **/

@Component
@RabbitListener(queues = "topic.woman")
public class TopicTotalReceiver {

    @RabbitHandler
    public void process(Map testMessage) {
        System.out.println("TopicTotalReceiver消费者收到消息  : " + testMessage.toString());
    }
}
同样,加主题交换机的相关配置,TopicRabbitConfig.java(消费者一定要加这个配置吗? 不需要的其实,理由在前面已经说过了。)
TopicRabbitConfig.java
import org.springframework.amqp.core.Binding;
import org.springframework.amqp.core.BindingBuilder;
import org.springframework.amqp.core.Queue;
import org.springframework.amqp.core.TopicExchange;
import org.springframework.context.annotation.Bean;
import org.springframework.context.annotation.Configuration;

/**
 * @Author : JCccc
 * @CreateTime : 2019/9/3
 * @Description :
 **/

@Configuration
public class TopicRabbitConfig {
    //绑定键
    public final static String man = "topic.man";
    public final static String woman = "topic.woman";

    @Bean
    public Queue firstQueue() {
        return new Queue(TopicRabbitConfig.man);
    }

    @Bean
    public Queue secondQueue() {
        return new Queue(TopicRabbitConfig.woman);
    }

    @Bean
    TopicExchange exchange() {
        return new TopicExchange("topicExchange");
    }


    //将firstQueue和topicExchange绑定,而且绑定的键值为topic.man
    //这样只要是消息携带的路由键是topic.man,才会分发到该队列
    @Bean
    Binding bindingExchangeMessage() {
        return BindingBuilder.bind(firstQueue()).to(exchange()).with(man);
    }

    //将secondQueue和topicExchange绑定,而且绑定的键值为用上通配路由键规则topic.#
    // 这样只要是消息携带的路由键是以topic.开头,都会分发到该队列
    @Bean
    Binding bindingExchangeMessage2() {
        return BindingBuilder.bind(secondQueue()).to(exchange()).with("topic.#");
    }

}
然后把rabbitmq-provider,rabbitmq-consumer两个项目都跑起来,
- 调用接口 /sendTopicMessage1:

然后看消费者rabbitmq-consumer的控制台输出情况: TopicManReceiver监听队列1,绑定键为:topic.man TopicTotalReceiver监听队列2,绑定键为:topic.# 而当前推送的消息,携带的路由键为:topic.man
所以可以看到两个监听消费者receiver都成功消费到了消息,因为这两个recevier监听的队列的绑定键都能与这条消息携带的路由键匹配上。

- 调用接口 /sendTopicMessage2:
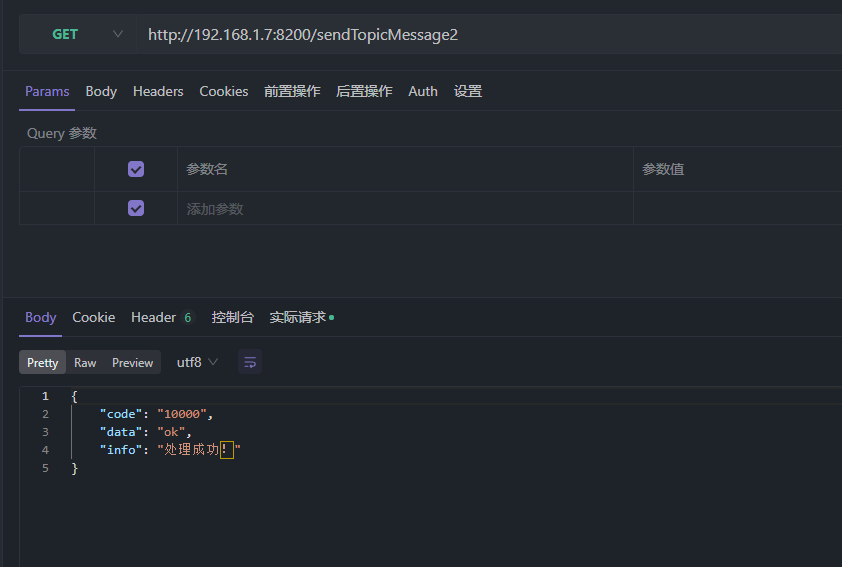
然后看消费者rabbitmq-consumer的控制台输出情况: TopicManReceiver监听队列1,绑定键为:topic.man TopicTotalReceiver监听队列2,绑定键为:topic.# 而当前推送的消息,携带的路由键为:topic.woman 所以可以看到两个监听消费者只有TopicTotalReceiver成功消费到了消息。

交换机-Fanout
生产服
创建FanoutRabbitConfig.java
import org.springframework.amqp.core.Binding;
import org.springframework.amqp.core.BindingBuilder;
import org.springframework.amqp.core.FanoutExchange;
import org.springframework.amqp.core.Queue;
import org.springframework.context.annotation.Bean;
import org.springframework.context.annotation.Configuration;
/**
 * @Author :
 * @CreateTime :
 * @Description :
 **/

@Configuration
public class FanoutRabbitConfig {

    /**
     *  创建三个队列 :fanout.A   fanout.B  fanout.C
     *  将三个队列都绑定在交换机 fanoutExchange 上
     *  因为是扇型交换机, 路由键无需配置,配置也不起作用
     */


    @Bean
    public Queue queueA() {
        return new Queue("fanout.A");
    }

    @Bean
    public Queue queueB() {
        return new Queue("fanout.B");
    }

    @Bean
    public Queue queueC() {
        return new Queue("fanout.C");
    }

    @Bean
    FanoutExchange fanoutExchange() {
        return new FanoutExchange("fanoutExchange");
    }

    @Bean
    Binding bindingExchangeA() {
        return BindingBuilder.bind(queueA()).to(fanoutExchange());
    }

    @Bean
    Binding bindingExchangeB() {
        return BindingBuilder.bind(queueB()).to(fanoutExchange());
    }

    @Bean
    Binding bindingExchangeC() {
        return BindingBuilder.bind(queueC()).to(fanoutExchange());
    }
}
添加接口
    @GetMapping("/sendFanoutMessage")
    public String sendFanoutMessage() {
        String messageId = String.valueOf(UUID.randomUUID());
        String messageData = "message: testFanoutMessage ";
        String createTime = LocalDateTime.now().format(DateTimeFormatter.ofPattern("yyyy-MM-dd HH:mm:ss"));
        Map<String, Object> map = new HashMap<>();
        map.put("messageId", messageId);
        map.put("messageData", messageData);
        map.put("createTime", createTime);
        rabbitTemplate.convertAndSend("fanoutExchange", null, map);
        return "ok";
    }
消费服
FanoutReceiverA.java
import org.springframework.amqp.rabbit.annotation.RabbitHandler;
import org.springframework.amqp.rabbit.annotation.RabbitListener;
import org.springframework.stereotype.Component;
import java.util.Map;
/**
 * @Author :
 * @CreateTime :
 * @Description :
 **/
@Component
@RabbitListener(queues = "fanout.A")
public class FanoutReceiverA {

    @RabbitHandler
    public void process(Map testMessage) {
        System.out.println("FanoutReceiverA消费者收到消息  : " +testMessage.toString());
    }

}
FanoutReceiverB.java
import org.springframework.amqp.rabbit.annotation.RabbitHandler;
import org.springframework.amqp.rabbit.annotation.RabbitListener;
import org.springframework.stereotype.Component;
import java.util.Map;
/**
 * @Author :
 * @CreateTime :
 * @Description :
 **/
@Component
@RabbitListener(queues = "fanout.B")
public class FanoutReceiverB {

    @RabbitHandler
    public void process(Map testMessage) {
        System.out.println("FanoutReceiverB消费者收到消息  : " +testMessage.toString());
    }

}
FanoutReceiverC.java
import org.springframework.amqp.rabbit.annotation.RabbitHandler;
import org.springframework.amqp.rabbit.annotation.RabbitListener;
import org.springframework.stereotype.Component;
import java.util.Map;

/**
 * @Author :
 * @CreateTime :
 * @Description :
 **/
@Component
@RabbitListener(queues = "fanout.C")
public class FanoutReceiverC {

    @RabbitHandler
    public void process(Map testMessage) {
        System.out.println("FanoutReceiverC消费者收到消息  : " +testMessage.toString());
    }

}
然后加上扇型交换机的配置类,FanoutRabbitConfig.java(消费者真的要加这个配置吗? 不需要的其实,理由在前面已经说过了):
import org.springframework.amqp.core.Binding;
import org.springframework.amqp.core.BindingBuilder;
import org.springframework.amqp.core.FanoutExchange;
import org.springframework.amqp.core.Queue;
import org.springframework.context.annotation.Bean;
import org.springframework.context.annotation.Configuration;
/**
 * @Author :
 * @CreateTime :
 * @Description :
 **/
@Configuration
public class FanoutRabbitConfig {

    /**
     *  创建三个队列 :fanout.A   fanout.B  fanout.C
     *  将三个队列都绑定在交换机 fanoutExchange 上
     *  因为是扇型交换机, 路由键无需配置,配置也不起作用
     */


    @Bean
    public Queue queueA() {
        return new Queue("fanout.A");
    }

    @Bean
    public Queue queueB() {
        return new Queue("fanout.B");
    }

    @Bean
    public Queue queueC() {
        return new Queue("fanout.C");
    }

    @Bean
    FanoutExchange fanoutExchange() {
        return new FanoutExchange("fanoutExchange");
    }

    @Bean
    Binding bindingExchangeA() {
        return BindingBuilder.bind(queueA()).to(fanoutExchange());
    }

    @Bean
    Binding bindingExchangeB() {
        return BindingBuilder.bind(queueB()).to(fanoutExchange());
    }

    @Bean
    Binding bindingExchangeC() {
        return BindingBuilder.bind(queueC()).to(fanoutExchange());
    }
}
项目都跑起来,调用下接口/sendFanoutMessage
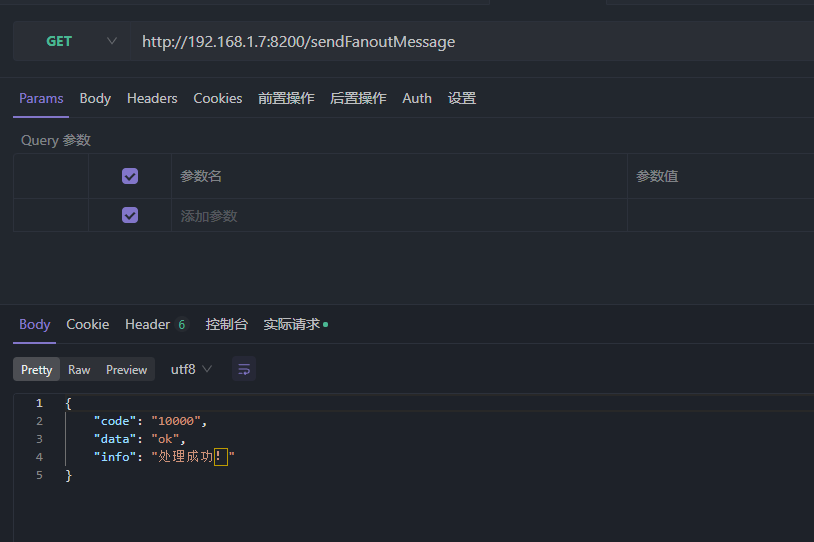
可以看到只要发送到 fanoutExchange 这个扇型交换机的消息, 三个队列都绑定这个交换机,所以三个消息接收类都监听到了这条消息。

到了这里其实三个常用的交换机的使用我们已经完毕了,那么接下来我们继续讲讲消息的回调,其实就是消息确认(生产者推送消息成功,消费者接收消息成功)。
在生产服项目的application.yml文件上,加上消息确认的配置项后
ps: 本篇文章使用springboot版本为 2.1.7.RELEASE ; 如果你们在配置确认回调,测试发现无法触发回调函数,那么存在原因也许是因为版本导致的配置项不起效, 可以把
publisher-confirms: true替换为publisher-confirm-type: correlated
server:
  port: 5672

spring:
  rabbitmq:
    host: localhost  #mq服务器ip,默认为localhost
    port: 5672          #mq服务器port,默认为5672
    username: guest     #mq服务器username,默认为gust
    password: guest     #mq服务器password,默认为guest
      #确认消息已发送到交换机(Exchange)
    #publisher-confirms: true
    publisher-confirm-type: correlated
      #确认消息已发送到队列(Queue)
    publisher-returns: true
到这里,生产者推送消息的消息确认调用回调函数已经完毕。
可以看到上面写了两个回调函数,一个叫 ConfirmCallback ,一个叫 RetrunCallback;
那么以上这两种回调函数都是在什么情况会触发呢?
先从总体的情况分析,推送消息存在四种情况:
①消息推送到server,但是在server里找不到交换机
②消息推送到server,找到交换机了,但是没找到队列
③消息推送到sever,交换机和队列啥都没找到
④消息推送成功
那么我先写几个接口来分别测试和认证下以上4种情况
消息确认触发回调函数的情况:
①消息推送到server,但是在server里找不到交换机 写个测试接口,把消息推送到名为‘non-existent-exchange’的交换机上(这个交换机是没有创建没有配置的):
