虚拟机安装Linux

虚拟机安装
TIP
VirtualBox 是一款开源虚拟机软件,由Sun公司出品,现在则由Oracle进行开发。VirtualBox号称是最强的免费虚拟机软件,它性能优异且简单易用。可虚拟的系统包括Windows、Linux、MacOS、Android等操作系统!本文将使用VirtualBox作为虚拟机来安装Linux系统。
VirtualBox的安装
我们先下载VirtualBox安装包,下载地址:https://www.virtualbox.org/wiki/Downloads

- 下载完成后双击运行安装包一路点击下一步即可:

- 中途需要自定义一下安装路径:
- 错误情况 我在安装virtualbox最新版7.1.2时候(此教程是:v7.0.4),因为默认安装在C盘,我改成了D盘,然后就报错
Invalid installation directory
The chosen installation directory is invalid, as it does not meet the security requirements.
Refer to the Oracle WM VirtualBox7.1.2 manual for more information.
Please choose another directory for installing Oracle wMWirtualBox 7.1.2.
官方手册给出的详细情况。按照上面的解决办法即可。
- 解决办法
执行下面的命令,成功之后再去安装就可以了。D:\developer\tools\Virtualbox 替换成自己的安装路径。
icacls D:\developer\tools\Virtualbox /reset /t /c
icacls D:\developer\tools\Virtualbox /inheritance:d /t /c
icacls D:\developer\tools\Virtualbox /grant *S-1-5-32-545:(OI)(CI)(RX)
icacls D:\developer\tools\Virtualbox /deny *S-1-5-32-545:(DE,WD,AD,WEA,WA)
icacls D:\developer\tools\Virtualbox /grant *S-1-5-11:(OI)(CI)(RX)
icacls D:\developer\tools\Virtualbox /deny *S-1-5-11:(DE,WD,AD,WEA,WA)
- 最后点击完成,完成安装。

创建虚拟机
- 创建一个Linux虚拟机:

- 分配虚拟机内存大小,可以根据自己电脑配置来决定:

- 创建虚拟硬盘,设置好虚拟硬盘的大小,这里推荐设置30G以上:

- 设置完成后确认安装信息如下。

Linux系统安装
TIP
CentOS(Community Enterprise Operating System)是Linux发行版之一,中文意思为社区企业操作系统。它是来自于商业版 Red Hat Enterprise Linux依照开放源代码规定释出的源代码所编译而成,因此具有高度稳定性且完全开源。本文将以CentOS 7.9为例来介绍Linux系统的安装。
- 下载
这里我们将从阿里云的开源镜像站进行下载,网站地址为:https://mirrors.aliyun.com
这里我们选择的下载文件为CentOS-7-x86_64-DVD-2009.iso,下载地址:https://mirrors.aliyun.com/centos/7.9.2009/isos/x86_64/
- 安装
- 为虚拟机添加虚拟光盘,虚拟光盘指定为我们下载的ISO镜像文件:

- 备注:这里可以不进行挂载虚拟光盘,当启动虚拟机检测没有系统文件会弹出让您选择一个镜像系统文件进行安装。
 2. 点击启动运行虚拟机:

- 运行成功后,选择Install CentOS 7进行安装:

- 选择系统安装过程中的语言,建议选择English选项:

- 需要进行设置的部分示意图:

- 时区设置,地区选择Asia,城市选择Shanghai:

- 语言支持选择安装英文、简体中文两种语言安装包:

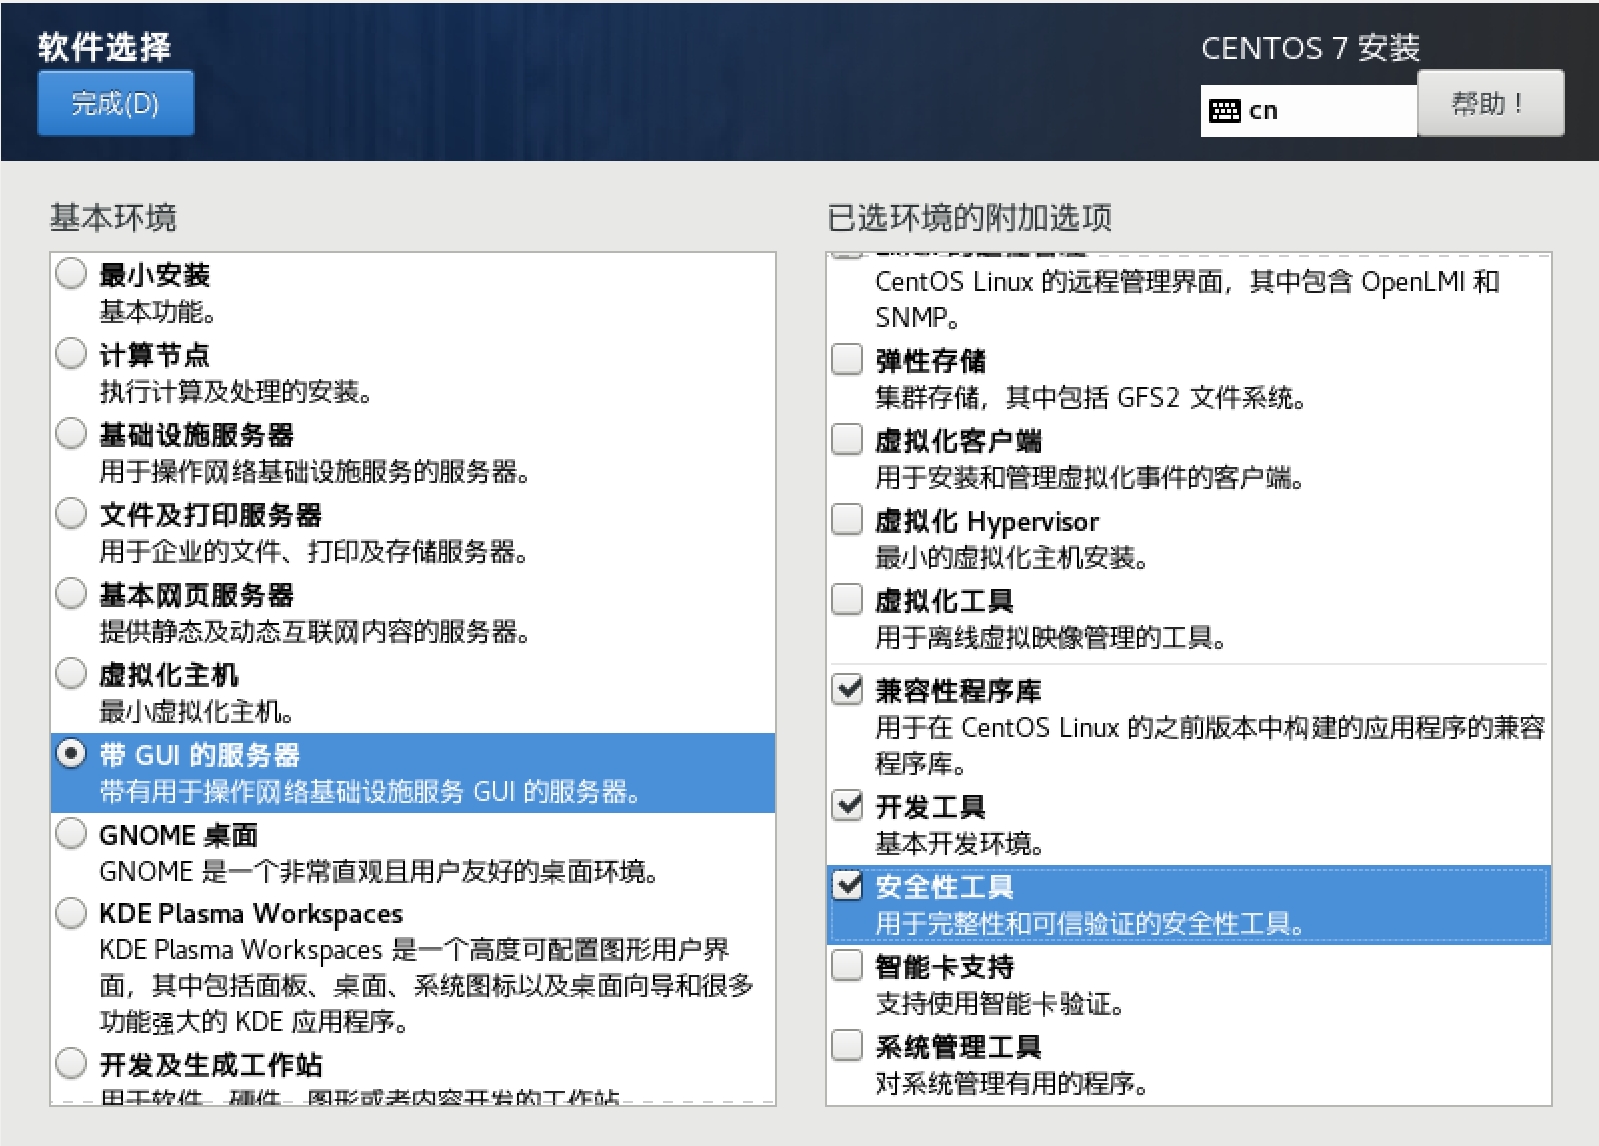
- 软件安装设置选择Server with GUI,同时选择如图三种附加环境:


- 磁盘分区设置,直接设置自动分区即可:

- 如果你想手动分区的话可以参考下,有时候虚拟机设置的内存较小,需要创建一个较大的swap分区:

- 按如图所示进行手动分区操作;

- 关于分区的几个目录的说明:
/:根分区;
swap:交换分区,可以当虚拟内存使用;
/boot:存储系统的引导信息和内核信息;
/usr:存储系统应用软件安装信息;
/var:存储系统日志信息。- 网络设置,设置主机名称和进行网络激活操作:

- 单击Begin Installation进行安装:

- 安装过程中可以设置root用户的密码;
- 备注:如果提示密码过于简单,点击2次完成即可。

- 完成安装后重新启动即可进入系统:
- 备注:如果竞选了
Server with GUI软件工具的安装,会提供UI操作界面类似Mac OS界面一样,第一次启动需要同意协议并完成配置:

- 此时宿主机还无法直接访问虚拟机,需要将虚拟机的网络模式改为桥接模式才可以。

CentOS系统小工具
- nano编辑器
yum install nano -y- network的工具包
#net-tools:含有netstat、ifconfig、route、arp等命令
yum install net-tools -y- wget
yum install wget -y- curl
yum install -y curl curl-devel- zip unzip
yum install -y zip unzip- vim
yum install -y vim- openssl
yum -y install openssl openssl-devel- zlib
yum -y install zlib zlib-devel make libtool- ifconfig
yum install -y net-tools.x86_64- 更新软件到最新
yum update -y设置阿里云源
- 备份系统源
mv /etc/yum.repos.d/CentOS-Base.repo /etc/yum.repos.d/CentOS-Base.repo.backup- 查看结果
ll /etc/yum.repos.d/- 下载新的 CentOS-Base.repo 到 /etc/yum.repos.d/ 阿里云CentOS源
选择对应的系统版本,我这里是7.9,选择7的源
wget -O /etc/yum.repos.d/CentOS-Base.repo https://mirrors.aliyun.com/repo/Centos-7.repo- 刷新缓存
yum makecache静态IP设置
查询虚拟机IP地址
ip addr show或者 安装相应的工具net-tools
sudo yum -y install net-tools

ifconfig -a- 切换到网络配置文件的路径
cd /etc/sysconfig/network-scripts/
- 编辑
vi ifcfg-enp0s3文件
TYPE="Ethernet"
PROXY_METHOD="none"
BROWSER_ONLn="no"
BOOTPROTO="dhcpOXY_METHOD="none"
BROWSER_ONLY="no"
BOOTPROTO="dhcp"
DEFROUTE="yes"
IPV4_FAILURE_FATAL="no"
IPV6INIT="yes"
IPV6_AUTOCONF="yes"
IPV6_DEFROUTE="yes"
IPV6_FAILURE_FATAL="no"
IPV6_ADDR_GEN_MODE="stable-privacy"
NAME="enp0s3"
UUID="6d264e52- 修改为
TYPE="Ethernet"
PROXY_METHOD="none"
BROWSER_ONLY="no"
BOOTPROTO="static" # 修改为 static
DEFROUTE="yes"
IPV4_FAILURE_FATAL="no"
IPV6INIT="yes"
IPV6_AUTOCONF="yes"
IPV6_DEFROUTE="yes"
IPV6_FAILURE_FATAL="no"
IPV6_ADDR_GEN_MODE="stable-privacy"
NAME="enp0s3" # 对应的文件名后缀
UUID="aae4e2d3-c67c-4b32-bfaf-503664885f78" # uuid值
DEVICE="enp0s3"
ONBOOT="yes"
IPADDR=192.168.1.11  # 静态ip ,只要IP在 192.168.1.0 / 24 这个网段就行

#设置dns
#PEERDNS=no
#DNS1=8.8.8.8
#DNS2=8.8.4.4- 重启网络服务
service network restart
# 或者
#sudo systemctl restart network- 查看网卡情况
sudo systemctl status network- Ping
ping www.baidu.com- DNS查看
nslookup google.com- 查看ip
ip addr show没有ifconfig命令,则可安装
yum install net-toolsxshell连接【可选】
- 安装sshd服务
yum install openssh-clients.x86_64- 修改sshd配置文件
vim /etc/ssh/sshd_config- 修改的内容
# 第17行
Port 22
# AddressFamily any
ListenAddress 0.0.0.0
ListenAddress ::

# 第37行
#LoginGraceTime 2m
PermitRootLogin yes
#StrictModes yes
#MaxAuthTries 6
#MaxSessions 10

# 第62行
# To disable tunneled clear text passwords, change to no here!
#PasswordAuthentication yes
#PermitEmptyPasswords no
PasswordAuthentication yes- 开启sshd服务
service sshd start- 检查是否开启sshd服务
ps -ef | grep sshd
# 或者
netstat -anp | grep 22- 开启自启动sshd服务
systemctl enable sshd- 查看是否开启了自启动sshd服务
[root@localhost network-scripts]# systemctl list-unit-files | grep sshd
sshd-keygen.service                           static
sshd.service                                  enabled
sshd@.service                                 static
sshd.socket                                   disabled
这样即可用 xshell 连接了。
